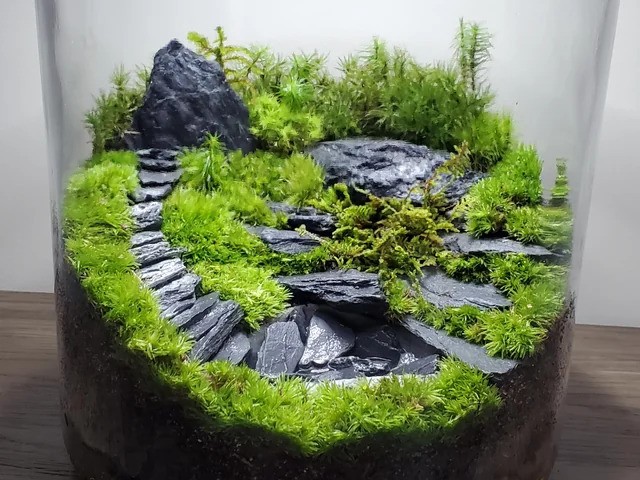
Moss terrariums are a charming and low-maintenance way to bring a touch of nature indoors. They are perfect for beginners, as they require minimal care and offer a rewarding, hands-on experience.This guide will walk you through the process step-by-step, ensuring you create a terrarium that’s both visually appealing and easy to maintain.
Before you begin, gather the following materials:
- A clear glass jar with a lid
- Natural fine pea gravel
- Substrate barrier (e.g., landscape fabric or fine mesh)
- Terrarium substrate mix (a blend of potting soil, sand, and peat moss)
- A detailed rock (georock or any other interesting stone)
- Fern moss (or another type of moss)
- Long tweezers
- Small twigs
- Additional small rocks for decoration
- Springtails (tiny beneficial bugs)
- Spray bottle filled with water
- Small stick with a cork (for leveling stones)
1. Prepare the Drainage Layer
Start by adding a layer of natural fine pea gravel to the bottom of your glass jar. This drainage layer helps prevent water from accumulating at the bottom, which can lead to root rot. Use a small stick with a cork on the end to level the gravel, ensuring an even base for the substrate.
2. Add the Substrate Barrier
Cut a rough circle from your substrate barrier material to fit inside the jar. This barrier will prevent the substrate mix from mingling with the drainage layer, maintaining clear separation between the two. Place the cut barrier on top of the pea gravel.
3. Add the Substrate
Next, add your terrarium substrate mix on top of the barrier. Aim to slope the substrate higher towards the back of the jar to create depth and interest in your terrarium. This sloped effect will make the overall arrangement more dynamic and visually appealing.
4. Create the Hardscape
Now it’s time to add the hardscape elements. Choose a detailed rock as the centerpiece of your terrarium. Take your time selecting the right piece, experimenting with different rocks to find one that complements your design. Place the chosen rock in the center, ensuring it is stable and visually prominent.
5. Plant the Moss
Using long tweezers, carefully place small chunks of fern moss around the rock and on the substrate. Gently press the moss down with your hand to help it adhere to the substrate. This will also ensure it can wick up moisture effectively, which is crucial for its growth and health.
6. Add Decorative Elements
Enhance the terrarium’s natural look by adding small twigs and extra rocks. Cut the twigs to appropriate sizes and place them in the terrarium. You can position the twigs to look like small trees or roots growing over the rocks. The variety in sizes and the presence of multiple branches will add to the terrarium’s intricate details.
7. Introduce Beneficial Inhabitants
To keep your terrarium clean and healthy, introduce springtails. These tiny bugs help control mold growth by consuming it and recycling it into nutrients that the moss can use. Simply sprinkle a few springtails into the terrarium.
8. Water the Terrarium
Use a small spray bottle to mist the terrarium lightly. This method helps prevent overwatering, which can be detrimental to your moss. Maintain a consistent level of humidity to keep the moss lush and vibrant.
Your nano moss terrarium is now complete! The combination of the detailed rock, vibrant moss, and natural elements like twigs and stones creates a miniature ecosystem that’s both beautiful and functional. Place your terrarium in a spot with indirect light and enjoy the touch of nature it brings to your space.
With a little creativity and patience, you can create a beautiful and miniature forest in your own home. Enjoy the process and the beauty of your moss terrarium!